"HELP FILE" and "HELP TOPIC" Attributes
If you have created a custom .chm help file for your BuilderPlus GUI, you can access it under program control using this syntax:
CONTROL @Main;SET ("HELP FILE":help_file_name$,"HELP TOPIC":name.topic$)
For example, to show the Table of Contents in your custom MyHelp.chm file:
CONTROL @Main;SET ("HELP FILE":"MyHelp.chm","HELP TOPIC":"MyHelp.TOC")
Using a Help-Authoring Tool to Builld Your Own Help File
You can use any Windows Help-Authoring system (including the free Microsoft HTML Help Workshop hhw.exe) to create a Windows .chm file. Then, in your HTBasic program, make sure the "Help Topic":topic_id string matches the topic for your widget control in your Help File.
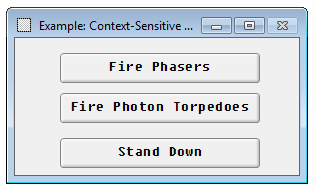
In the BuilderPlus example programs install folder there is the program
Context-Sensitive Help (shown below) that accesses a sample user defined help file (weapons.chm) also included in the installation directory. When running this program, if you right-click on a button like "Fire Phasers", the appropriate Help topic appears. This example program places three buttons on the main panel:
In this example, Line 200 displays "HELP TOPIC":"weapons.TOC" in the "HELP FILE":"weapons .chm":
CONTROL @Main;SET ("HELP FILE":S$,"HELP TOPIC":"weapons.TOC")
And Line 270 displays "HELP TOPIC":"weapons.phasers" in the "HELP FILE":"weapons .chm":
CONTROL @Phasers;SET ("HELP FILE":S$,"HELP TOPIC":"weapons.phasers")
10 ! *********************************************************************
20 ! Example: Context-Sensitive Help
30 !
40 ! This program displays three pushbuttons (Fire Phasers,
50 ! Fire Photon Torpedoes, and Stand Down). You can display
60 ! the definitions of these pushbuttons by placing the cursor
70 ! on the desired pushbutton and clicking the RIGHT mouse
80 ! button.
90 !
100 ! *********************************************************
110 !
120 DIM S$[256] ! GP string
130 S$="weapons.chm" ! Help file name
140 !
150 ! Create the PANEL widget
160 !
170 ASSIGN @Main TO WIDGET "PANEL";SET ("VISIBLE":0)
180 CONTROL @Main;SET ("X":50,"Y":25,"WIDTH":300,"HEIGHT":175)
190 CONTROL @Main;SET ("TITLE":" Example: Context-Sensitive Help","SYSTEM MENU":"Quit")
200 CONTROL @Main;SET ("HELP FILE":S$,"HELP TOPIC":"weapons.TOC")
210 !
220 ! Set up buttons
230 !
240 ASSIGN @Phasers TO WIDGET "PUSHBUTTON";PARENT @Main
250 CONTROL @Phasers;SET ("X":45,"Y":15,"WIDTH":200,"HEIGHT":30)
260 CONTROL @Phasers;SET ("LABEL":"Fire Phasers")
270 CONTROL @Phasers;SET ("HELP FILE":S$,"HELP TOPIC":"weapons.phasers")
280 !
290 ASSIGN @Torps TO WIDGET "PUSHBUTTON";PARENT @Main
300 CONTROL @Torps;SET ("X":45,"Y":55,"WIDTH":200,"HEIGHT":30)
310 CONTROL @Torps;SET ("LABEL":"Fire Photon Torpedoes")
320 CONTROL @Torps;SET ("HELP FILE":S$,"HELP TOPIC":"weapons.torp")
330 !
340 ASSIGN @Off TO WIDGET "PUSHBUTTON";PARENT @Main
350 CONTROL @Off;SET ("X":45,"Y":100,"WIDTH":200,"HEIGHT":30)
360 CONTROL @Off;SET ("LABEL":"Stand Down")
370 CONTROL @Off;SET ("HELP FILE":S$,"HELP TOPIC":"weapons.off")
380 !
390 ! Set up events and loop
400 !
410 ON EVENT @Phasers,"ACTIVATED" GOSUB Phasers
420 ON EVENT @Torps,"ACTIVATED" GOSUB Torps
430 ON EVENT @Off,"ACTIVATED" GOSUB Off
440 ON EVENT @Main,"SYSTEM MENU" GOTO Finis
450 !
460 CONTROL @Main;SET ("VISIBLE":1)
470 !
480 LOOP
490 WAIT FOR EVENT
500 END LOOP
510 STOP
520 !
530 ! ********************* Subroutines Start Here ************************
540 !
550 Phasers: !
560 DIALOG "INFORMATION","Fired phasers!"
570 RETURN
580 !
590 Torps: !
600 DIALOG "INFORMATION","Fired photon torpedoes!"
610 RETURN
620 !
630 Off: !
640 DIALOG "INFORMATION","Weapons system standing down."
650 RETURN
660 !
670 Finis: !
680 ASSIGN @Main TO * ! Delete PANEL widget
690 END