Getting Started With Dialogs
A dialog is an BuilderPlus entity that is created on the screen with the DIALOG statement from an executing BASIC program or from the command line. From a programming point of view, the DIALOG statement is similar to the INPUT statement of BASIC. From the user's point of view, a dialog is a popup that disappears after the user supplies a response.
Using the DIALOG Command
Dialogs are created and modified with the DIALOG command. The DIALOG command consists of a dialog type (the name of the dialog), a prompt string, a selected button option, optional SET and RETURN attributes, and a TIMEOUT option. See the DIALOG command description for details on the DIALOG command.
All DIALOG command statements MUST fit on one line, since the program will wait until the DIALOG statement is executed before proceeding.
For an overview of using dialogs, copy the example help program Dialogs into your HTBasic Editor and run the program. Click Dialog Tests to select a dialog. See Copying Example Programs for procedures to copy example programs.
Creating Dialogs
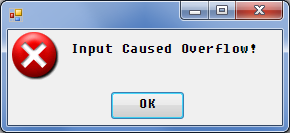
To show how to create dialogs, we will use the DIALOG command to create an ERROR dialog. The ERROR dialog displays an error message and halts program execution until the user acknowledges the error. For the default ERROR dialog state, a single "OK" button is displayed.
When the following lines are typed, the display shown appears. This display remains (and program execution is halted) until the user clicks the OK button.
! Example: Default ERROR Dialog
DIALOG "ERROR","Input caused overflow!"
END
For this example, the dialog type is "ERROR" (which must be entered in upper case) and the prompt string is "Input caused overflow!". The SET and RETURN attribute list default values are used.
Since no TIMEOUT timeout value is set, this dialog will remain on the screen until the user selects the OK button or presses the Spacebar or the Return key. The program then continues.
Modifying Dialogs
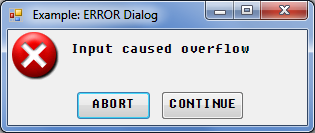
As desired, you can use the SET, RETURN, and TIMEOUT attributes to modify the dialog. To continue the ERROR dialog example, we will customize the dialog from the previous display to provide the user with some options.
When the following program is run, the display shown appears. Since TIMEOUT 5 is set, if the user makes no response within 5 seconds after the dialog appears, the dialog automatically disappears and program execution resumes.
! Example: Modifying ERROR Dialog
!
DIM S1$(0:1)[10]
INTEGER Btn
S1$(0)="Abort"
S1$(1)="Continue"
DIALOG "ERROR","Input caused overflow!",Btn;SET("DIALOG BUTTONS":S1$(*)),TIMEOUT 5
IF Btn=-1 THEN ! Btn=-1 indicates TIMEOUT
DISP "Timeout"
ELSE
DISP S1$(Btn)
END IF
END
In addition, two new buttons (Abort and Continue) have been added to replace the OK button. The SET statement invokes the DIALOG BUTTONS attribute and string array S1$. S1$ contains the names of buttons to use as well as the button value.
When the dialog pops up, the mouse pointer appears on top of the Abort button (the DEFAULT BUTTON for the ERROR dialog), allowing the user to respond by pressing the Spacebar or the Return key. You can move the pointer to the Continue button with the Tab key or the mouse and click, at which point the display disappears.
You can determine which button was selected by the user by querying the value of the selected button variable "Btn" (0 for Abort, 1 for Continue, or -1 for TIMEOUT). For dialogs, 0 always refers to the leftmost button, even if the button labels can be changed.
To find out which button the user pressed, DISP S1$(Btn) queries the selected button variable Btn. This variable contains the index of the button that was selected. For example, if the user clicks on the Abort button, the dialog disappears and the program displays "Abort". If the user clicks on Continue, the program displays "Continue".
You can use the Tab key to move from one button to the other and then press the Spacebar or the Return key to click the button, and you will get an index value back. For two or more buttons, you must use the DEFAULT BUTTON attribute. You can set this attribute to the value of the button index you want as the default.